Last updated 14/6/24
Aside from deciding that you want an engineered timber floor in your home, could there be a more significant decision than choosing whether to float or direct-stick your floor? We think not.
Direct sticking and floating engineered floors have both positive and negative implications, often biased toward the writer’s preference. We felt it necessary to write a comprehensive blog on this hot topic that weighs fairly on both sides. We also added some conditional considerations mainly around DIY. Later, we also include a third option for solid timber flooring insulation.
So what’s to consider, we hear you ask?
Well, in general terms, we feel the three overarching points are:
- One method is final and permanent & one is adaptable for change and more DIY-friendly
- The bias of many suppliers and installers to favour one option that may suit them over another
- The cost of floating floorboards compared with direct sticking is vastly different
We ask you to apply the information below considering the following points:
- Do you want the flooring to be a long-term option?
- What is your subfloor?
- Will you take the DIY path?
- Acclimatisation of the product
What is a Floating Floor?
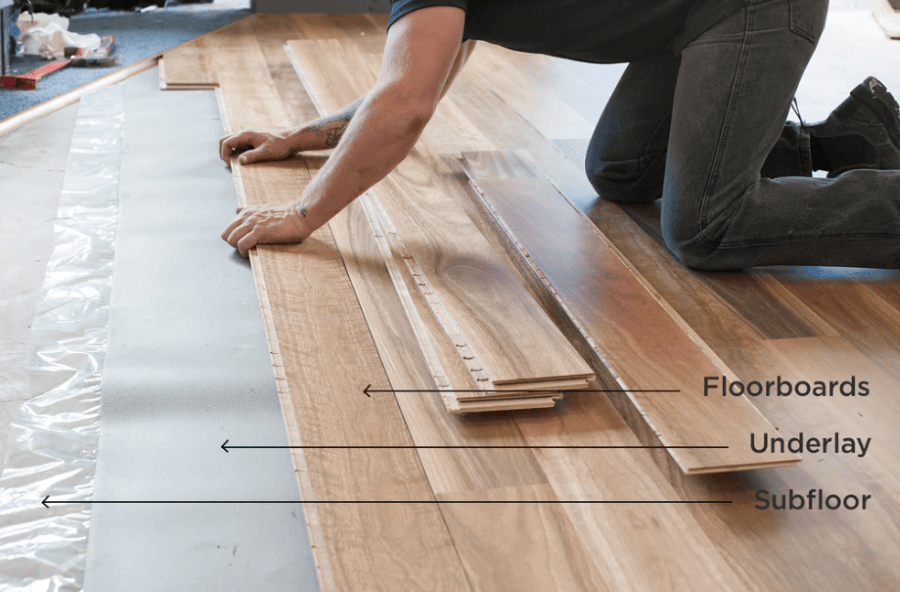
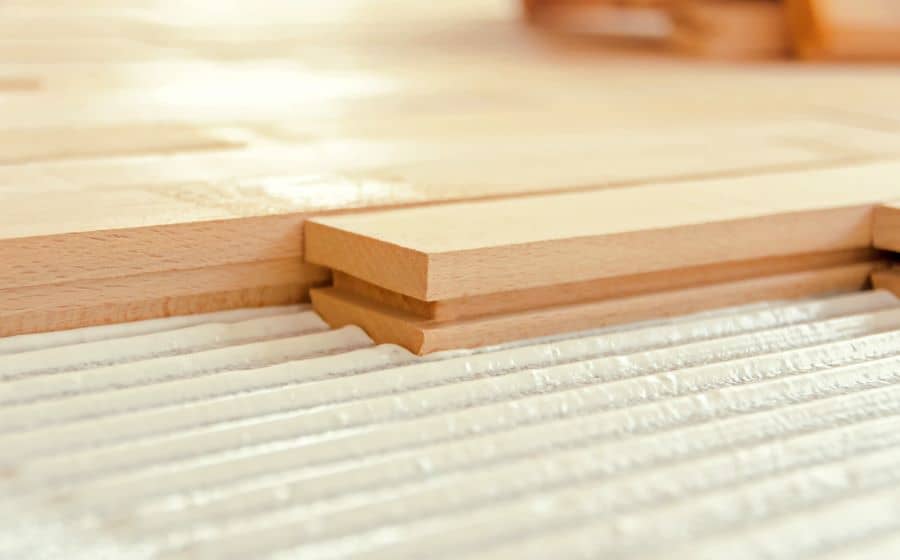
The floating floor concept came about in Europe, where people tended to take their kitchens, lights and floors with them when they moved house. Floating floors are floating floorboards because they float on top of a subfloor. The subfloor is the structural floor of your home, whether it is concrete, chipboard or timber. What you are laying your flooring product over the top of is your subfloor. A floating floor is not bonded to the subfloor. It is the product’s weight and friction that holds it in place. It is important to note that subfloor preparation must be perfectly level, and tolerance levels must be within supplier guidelines.
A floating engineered floorboard comprises different layers of hardwood meshed together, offering excellent strength. A typical engineered timber floating floor may weigh between 10 and 15 kilograms per square meter. If you lay 80 square meters of flooring, a significant weight will hold the flooring in place, with a large surface area creating friction. Floating floors will still hold enough weight even for small areas such as 3 x 3.5m Bedroom flooring. Proper acclimatization allows the product to expand and contract with humidity levels. Although easily removable, floating floors are designed to be durable and long-lasting. Engineered hardwoods are more durable and long-lasting than other types of floating flooring like laminate. When you choose the thicker option, you can refinish them as well.
Pros of a Floating Floor
- More DIY-friendly flooring option
- Much faster installation time
- No drying time with adhesives: The floor can usually be walked on immediately.
- Less expensive installation
- Easy to remove the flooring later if you ever want a change
- Easier to replace a single floorboard or part of the flooring if need be
- You can sell your old floor on eBay or Gumtree years down the track if you want to
- If you are trying to install a floor over a surface a direct stick floor can’t go over the top of it. It may be more convenient just to float the floor instead of changing the sub-floor composition

Expert Insights From Clem Sturgess
20+ years' experience in hard flooring
Most of the time, people are well educated when directly sticking their floor. Occasionally consumers may float their floor and only realize later that there is an option for them to direct stick, mainly if their floating floor was not what they envisioned under foot.
The main question to ask customers is this: Is this a forever floor, or is this a temporary floor?
Cons of a Floating Floor
- Acoustics are not as good, and it has a hollow sound that a lot of people don’t like. Floating floors are often referred to as ‘click-clack’ flooring because you can feel movement underneath due to their non-fixed nature. It does not feel as solid under your feet
- The floating floor will grow and shrink more than a directly stuck floor
- It is difficult to sand and recoat a floated floor. Floating floors tend to bounce when a sanding disk from a poly-vac machine is applied. This can cause radial ring marks throughout the floor
- Floating floors require a separate underlay which adds to the cost
- More susceptible to moisture
Expert Insights From Levi Saunders
Creaking in floated flooring generally occurs due to changes in temperature and humidity. The slight changes of size and shape in the individual boards create latent energy which is released as the floor is walked on and manifests as noise. This can be avoided by gluing the joins on a floated floor.

Expert Insights From Raquel Billett
Interior Décor Expert
I listen intently to the customer when choosing between floating and direct sticking. Things such as the makeup of the subfloor often sway the final opinion. For example, floating the floor is the only viable option if the subfloor is chipboard. Hybrid planks are the quietest floated and floor underfoot becuase the underlay is attached to the product. In comparison, timber is a harder product with a loose underlay leaving more room for noise underfoot when floated.
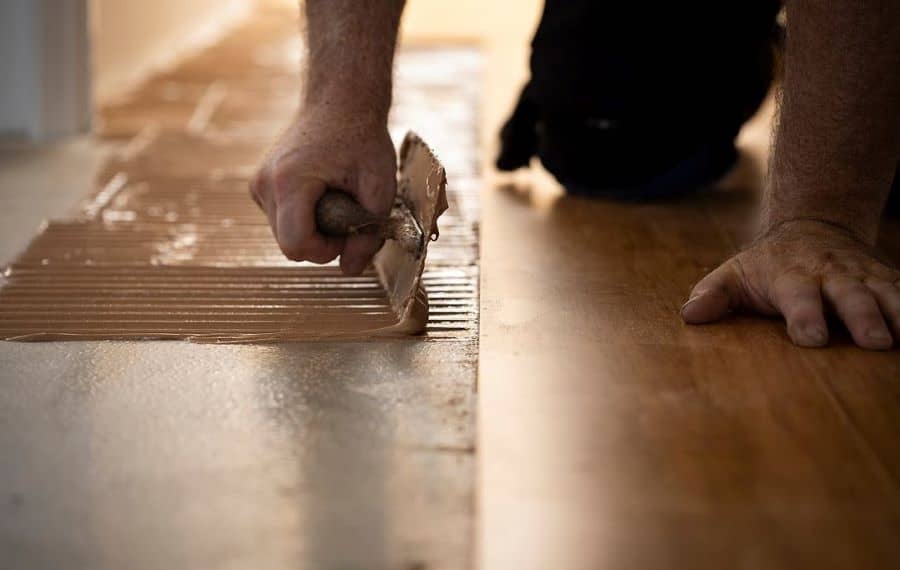
What is a Direct Stuck Floor?
Direct Sticking an Engineered Timber floor is essentially the opposite of a floating floor in nearly every way. It is bonded directly to the subfloor.
For Example:
- With a floating floor, the individual boards are locked or glued to each other. You don’t glue them to the subfloor.
- With a direct-stick floor, each board is individually glued to the floor with adhesive. The individual boards are not stuck to each other.
Subfloor Considerations: In any case like floating, if you want to have a flat subfloor. Adhesive can be a great way to even up a marginally uneven floor. In any case, you must adhere to the supplier’s guidelines, which are far stricter than Australian standards.
Pros of a Direct Stuck Floor
- In every way, to all but the most educated eye, a directly stuck engineered floor is indistinguishable from a solid timber floor once it is laid. It will sound, look and feel like a solid timber floor
- Easier to refinish. There is no movement or bounce during the floor sanding process. This is because the floor is stuck directly in place
- A direct Stuck Floor will grow and shrink less than a floated floor because it is fixed and restrained in position.
- A direct stuck engineered floor will grow and shrink less than a solid timber floor because of its engineered, cross-laminated construction
- Minimises the size and frequency of expansion breaks in your floor
- If your flooring is slightly more unlevel but still within reason; a direct stuck system can be a more favourable option to avoid having to be too fanatical about levelling
- Holds its value
- Less susceptible to moisture
Cons of a Direct Stuck Floor
- Damage becomes hard to repair. You will need to rely on other options such as repair kits, wax & fillers. To be clear, though, this is usually how timber floors are repaired anyway. We recommend reading this blog on repairing and replacing damaged flooring.
- A direct stick floor should not have additional flooring (such as other floating floors) laid over it because it needs to breathe. The direct stuck floor can grow and buckle if it cannot breathe, breaking through the additional floor covering
- The directly stuck floor is considered a permanent fixture. The amount of work involved in removing and preparing the subfloor can make changing the floor cost-prohibitive
- Cost is higher for installation and materials
- Far less DIY-friendly for reasons explained above
- Most adhesives necessitate the addition of a moisture barrier to the subfloor, which will increase costs
- You cannot direct stick to a yellow tongue or chipboard floor. You need to screw ply sheeting in place over these flooring types before you can direct stick. This adds another cost and also increases the height of the floor.
Solvent Based & Solvent Free Adhesives
If you decide to use the direct stick method, we are not too concerned about the adhesive brand, as long as it is solvent-free. Solvent-based adhesives dry very hard, in a very similar way to Plasti-bond. If there is any slab movement underneath the floor, the adhesive can crack because it has little to no flexibility. If you are dual bonding over a rubber underlay (for acoustic reasons,) solvents will also break down the rubber over time. Solvent-free (rubberised) adhesives are flexible, allowing for a small amount of slab movement that will not crack the Adhesive’s bond to your flooring as a solvent-based adhesive can.

Expert Insights From Dean Billett
28+ Years of flooring industry experience
If you are final with your decision and can afford to do it, I recommend directly sticking to engineered floors. It gives the flooring that solid feel and sounds much better underfoot. Floating a floor means it's less likely to remain level, and you can have a creaking sound when you walk on it.
- The cost of direct-sticking flooring is the main issue and can range from $65 - $85 per square meter to lay it, which needs to be completed by a professional.
- Floating your floor, in comparison, can be as little as $25 per square meter.
Additional Considerations
Below is a list of considerations when choosing between floating or directly sticking your engineered flooring. Many factors influence whether the DIY path is achievable for each installation.
DIY vs Professional Installation
If you haven’t already guessed, floating floor installation is more straightforward than direct stick application. Working with adhesives in both their use and understanding is an area that skilled tradespeople spend many years developing. For this reason, it is best to have a licensed professional install a direct stick timber floor unless you are a very skilled handy-person.
Locking Systems
As expected, the type of locking system on the flooring will have a bearing on DIY installation. For direct sticking to the subfloor, a tongue and groove system is the easiest option to use. The tongue and groove slot into place, and the adhesive sets with the floor in that position. There is no trying to get joining systems together while the adhesive is setting. You put the plank into the adhesive and then slide it into position.
For a floated floor, using a locking system is the easier option, as you do not have to use adhesives for the most part. You also do not have to worry about movement on the floor creating gaps between boards as the adhesive is setting. The locking system pulls itself tight. We recommend reading this blog on click-lock floor locking systems to understand more.
You can still use a tongue and groove system in a floated application, and a locking system can still be used in a direct stick application. There is no issue in either case: all will work. It is simply a question of which is easier.
Refinishing Engineered Flooring
As mentioned above, refinishing an engineered floated floor can be challenging, to say the least, and frankly unachievable in some cases. Radial sanding can cause a bouncing effect and leave undesirable ring marks. However, refinishing a directly stuck floated floor can look fantastic if done correctly.
Refinishing involves cutting the wear layer (polyurethane) from your floor with a sander and reapplying a coating. When you do this, you typically lose about 1mm of the timber. This gives your floor a limited lifespan before you have cut the veneer away totally.
Light Cutbacks
Instead of letting the floor deteriorate, you can perform a light cutback after about 3 years. Rather than removing the coating and timber completely, you simply rough up the coating with light-grade sandpaper. Then, you apply a single coat of Polyurethane, restoring your floor to its original condition. This may appear to be a more expensive option, but the reality is you leave your veneer close to 100% intact. The life of the engineered floor then becomes indefinite.
‘If you do decide to take the coating off of your floor, a wide world of other finishing options become available to you, as you are essentially back to bare wood. Oiling is an option that requires more regular maintenance but never requires you to apply a sander to your floor. Oil can also make scratches instantly disappear. Oiled Floors if kept healthy have a natural look that is hard to replicate.
Hard Wax oil is also an option and falls somewhere between an oiled floor and a lacquered floor in terms of maintenance. It also has a beautiful, natural look that is hard to replicate. You may also decide that you want to recolour your floor, apply reactive stains, or any combination of options that are generally not available ‘out of the box’.
Acclimatisation of Engineered Timber Flooring
Direct stuck-engineered flooring is less likely to expand and grow through the seasons than floated flooring. That being said, engineered flooring requires adequate acclimation before installation.
Some (not all) installation guides from suppliers are simple to cut and paste from documents made for other flooring markets. The manufacturers do not consider the Australian climate; instead, they target much smaller environments. Because Australia has a vast range of climates compared to most other countries, you must consider this when choosing natural flooring like timber.
Acclimatization is a significant factor for any timber flooring and should occur before installing the timber for the safest installation. Timber is a natural product that wants to meet equilibrium with your climate and will take in (grow,) and release (shrink,) moisture accordingly.
Typically, a timber floor will undergo curing in a factory overseas with an Environmental Moisture Content (EMC) between 7-9%. When you transport this product to the Eastern Sea Board of Australia, it’s going to rise to 14 – 15% EMC when opened and aired. That means it can be up to 8% EMC higher than the time you take it out of the box.
To put this in perspective: according to an extensive study on timber flooring growth rates by ATFA (Australasian Timber Flooring Association,) timber with a ply core, will typically grow .6mm per metre for every additional 5% that it rises in EMC.
What Are Your Options?
- Do nothing to acclimatise your flooring and deal with product growth or shrinkage problems later.
- Acclimatise the product and let it come close to equilibrium before you put it on the floor.
In very real terms, not acclimating your floor can be like releasing a restrained spring.
Of course, we believe you are far better off acclimatising the floor before laying the product. It can then equalise with the environment before installation. From here, it will still grow and shrink a little with the seasons, but the initial growth cycle will already have occurred. You may get lucky in the sense that your product has come from a warehouse with similar environmental conditions to your home. But without measuring the Moisture Content of your floor, there will be no way to know this.
Summarising How to Acclimatise Your Floor
- Take the boxed flooring into your house before installation (not the garage). Stack the boxes in piles on your floor.
- Open the ends of the boxes. If there is an internal plastic membrane around the timber, tear it open.
- Let it sit like this and breathe for a few weeks.
Simple right? Nearly time for a beer but let’s learn the theory behind it.
This will allow the timber to adapt to the environment. If you are in a dry or moist environment, you may want to give it a little longer. In general, the longer that you acclimatise your floor, the better off you are. You only need to open the ends of the boxes because this allows layers of the flooring to acclimate in a restrained state. This will help the floor boards to maintain their shape and prevent warping that will occur if the boards acclimate without restraint. This will also help to reduce any noise normally associated with a floated floor.
Although most flooring stores won’t approach the issue, acclimatisation is essential in Australia.
Choosing to ignore this issue is a bit like deciding to play in the middle of a highway: You might not get hit, but there’s a good chance it will happen, and the result won’t be pretty. We recommend reading this blog on acclimatising your timber floors to understand the topic further.
Secret Nail Direct Stick Application & Solid Flooring
We couldn’t finish a blog without addressing the elephant in the room: solid timber flooring.
Everything we have discussed above has been regarding engineered flooring; to be clear, there is no floated option for a solid timber floor. No Caveat.
For Solid timber flooring, we strongly recommend using only a professional installer. Again, no caveat.
You can direct stick flooring to concrete, but with subfloors such as chipboard and yellow tongue, you are unable to use adhesive to fix your flooring down.
In all cases case, the following needs to occur:
- Screw plywood over the top first
- Direct stick the product to the plywood
- As you lay each row of flooring, apply secret nails
Simple in theory, a headache in real life.
Secret nailing on tongue and groove timber starts with top nailing your first row of timber on the side of the plank that meets the wall that you are laying away from. From here, you secret nail each piece of timber to the floor with a nail through the internal bottom corner of the female join using a nail gun.
It is best to use a combination of direct sticking and secret nails with solid timber floors. The plywood bonds well with the adhesive, and the secret nail application further increases the likelihood of a successful installation. Recent fluctuations in weather conditions have caused timber flooring to undergo enormous stress, and this method helps to safeguard against that and provides an extra level of security.
Frequently Asked Questions About Direct Stuck vs. Floating Floors
Let me be straight with you; it's noticeable enough that we call them 'click-clack' floors in the industry. While hybrid planks with attached underlay tend to be quieter, traditional engineered timber floating floors can create that hollow sound because they're not physically bonded to the subfloor. If noise cancelling is important to you (especially in apartments or upper floors), direct stick is your best bet for that solid, traditional timber floor feel. That said, you can minimise the noise in floating floors by proper acclimatisation and gluing the joins, which helps prevent movement that causes creaking.
This is exactly the kind of question I love because it's all about your long-term plans. If you're looking at future renovations, floating floors are your friend. You can literally pick them up and sell them on Gumtree if you want! On the flip side, a direct stuck floor is essentially permanent and removing it is costly and can damage the subfloor.
Think of direct stick as a "forever floor" and floating as more of a "for now floor." Just remember, while floating floors offer that flexibility, they typically don't hold their value like direct stuck floors do.
Here's an interesting advantage of direct stick that many people don't know about: the adhesive can actually help even out minor subfloor imperfections.
While both methods require a relatively flat surface, direct stick is a bit more forgiving because the adhesive layer can help bridge small inconsistencies. That said, we're talking about minor variations here and if your floor looks like a skate park, you'll need proper leveling regardless of which method you choose. Just remember, if you're working with chipboard or yellow tongue subfloors, you'll need to install plywood first before direct sticking, which adds to both cost and floor height.
Professional direct stick installation typically runs between $65-85 per square meter, while floating floor installation can be as low as $25 per square meter.
However with direct stick, you're often looking at additional costs for moisture barriers and possibly subfloor preparation. And with floating floors, you'll need to factor in underlay costs.
If you're handy, floating floors are definitely more DIY-friendly, which can save significantly on installation costs. Just be honest with yourself about your DIY skills. I've seen plenty of DIY direct stick jobs that ended up costing more in the long run when a professional had to fix them.