Last edited 21/4/24
Knowing how to work out square meterage of a room will save you time and money. One dilemma you may face when laying your new floor is having too much product near the completion of your job or not enough product to finish it. Although there are many things you can do with upcycling flooring scraps, nobody wants too much extra flooring, which makes things more expensive than they have to be. Additionally, running short on products can be costly and painful.
However, with a little preparation, you can eliminate the guesswork around this if you learn how to work out the m² of a room correctly. We are all guilty of not reading instructions properly (or even at all) when we believe something is unimportant or when we want to get stuck into the job. But we can’t stress its importance on how to calculate m² of a room correctly. It just requires a little time and patience.
This post covers four simple and effective ways to measure your floor space. If you read the whole post, we promise we will have the method of measuring you need to follow down pat.
Apology in Advance:
Later in this blog, it will get a bit ‘Math-sey’. Unfortunately, because we are measuring meterages, this is unavoidable. Sorry.
How to Measure Room Size – What You Will Need
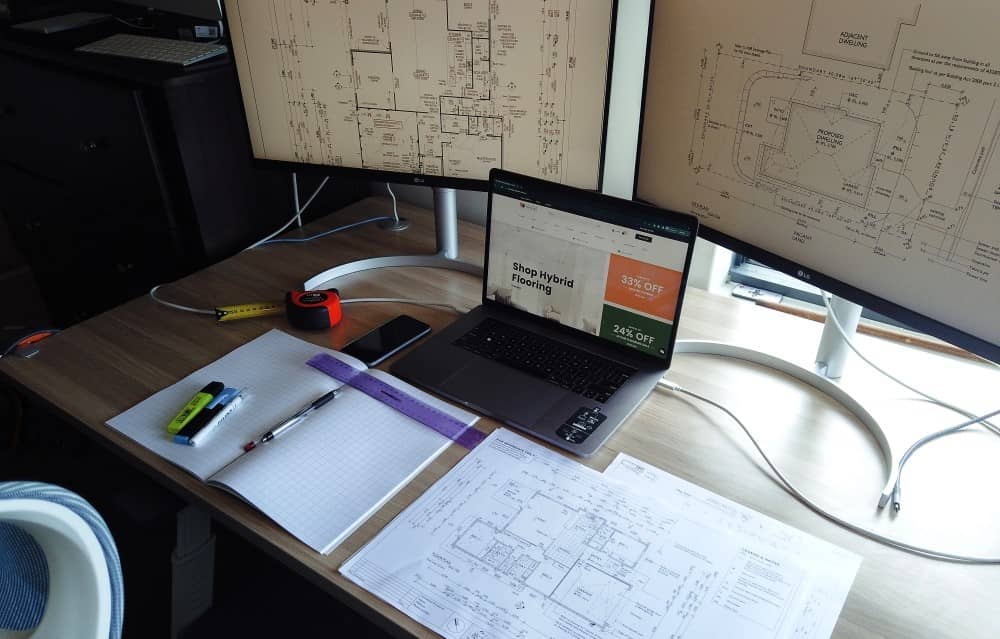
There are a few things you will need to do this, but they are things we usually all have around the house.
These things are as follows:
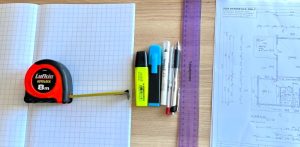
- pencil
- two different coloured pens
- highlighter
- standard ruler
- some blank paper (and graph paper if you have it)
- access to a photocopier that will enlarge (helpful, but not essential)
- a copy of your house plan (for methods 1 and 2), tape measure (for methods 3 and 4)
Measuring m² Using the House Plan Method
If you are fortunate enough to have a builder’s house plan to work off with your flooring measurements, you can use this method as it is the most accurate and easiest method.
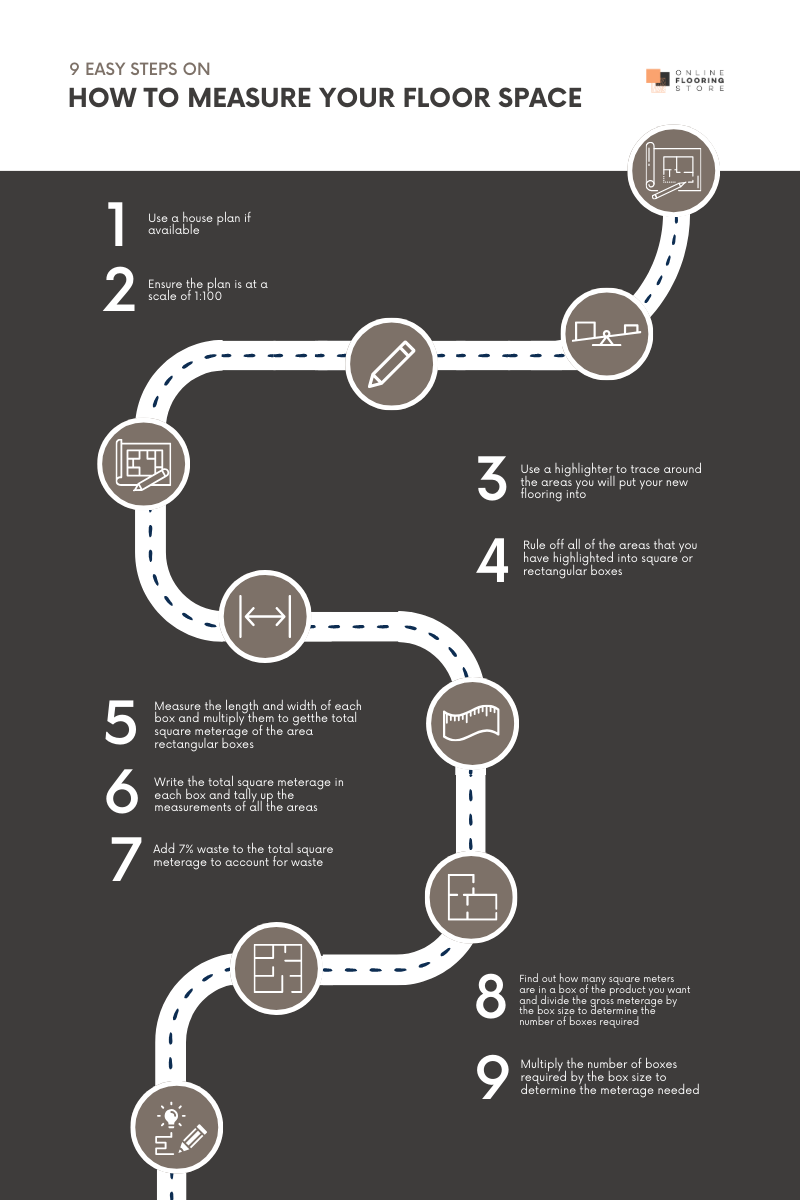
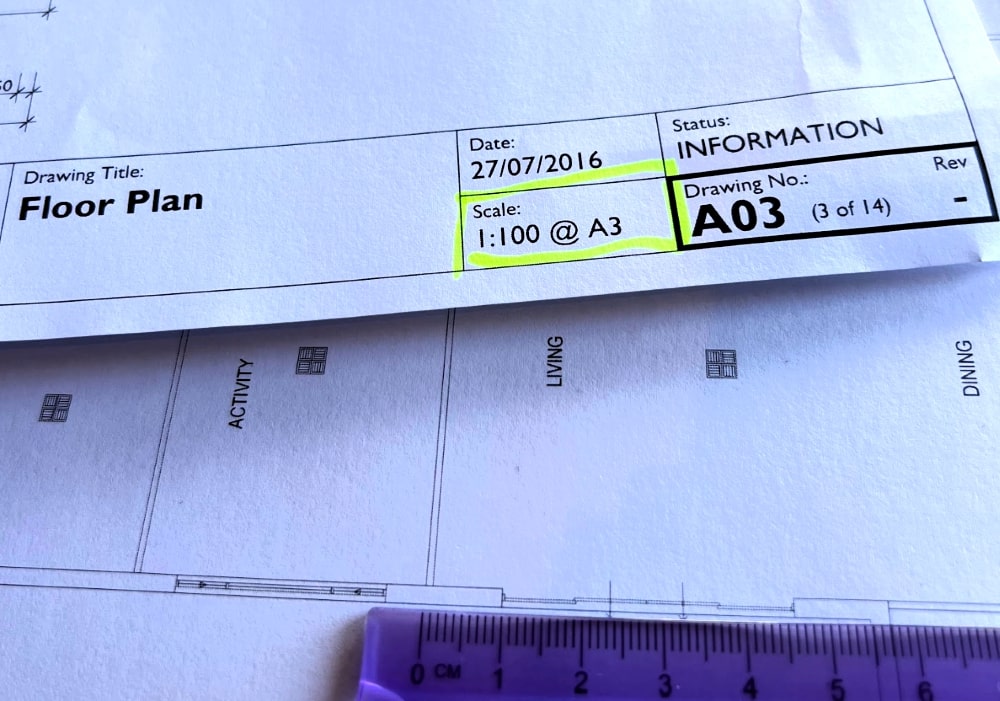
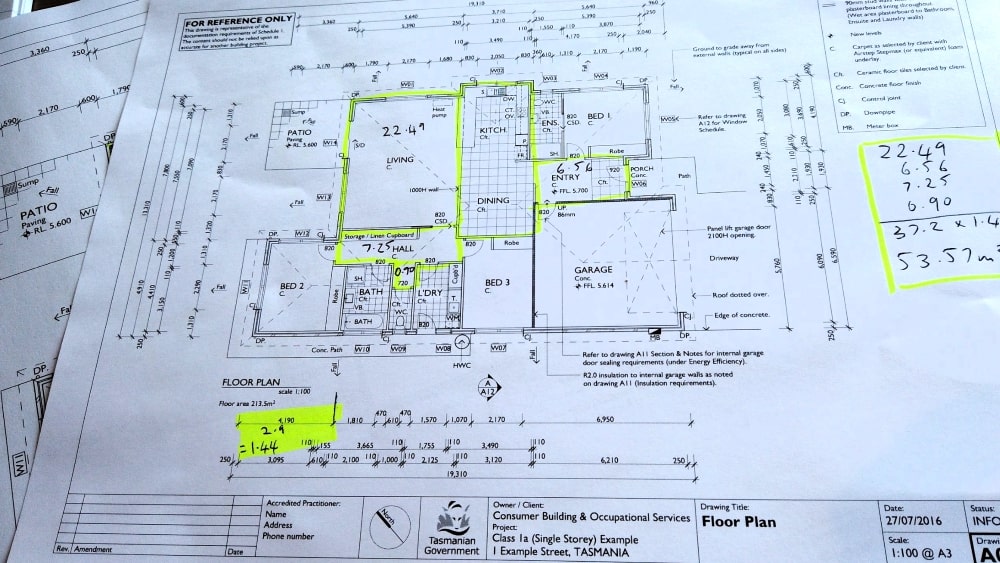
- First, you must ensure the plan is at a scale of 1:100. This means 1cm on your ruler will equal 1m of real floor space. The way you check this is to find the longest measurement on your plan and put a ruler beside it. Theoretically, if 15,000mm (as building plans are always in millimetres) on the plan comes to 150mm or 15cm on the ruler, then you are ready to go, and the plan is already at 1:100 scale. The plan may also offer the paper size on which it must be printed. In this case, below it is the typical A3 size.
If the scale is not at 1:100 scale, use a photocopier that allows you to enlarge. If your plan says 15,000mm, then you put your ruler on it, and says 10cm. We first have to convert centimetres to millimetres. So, 10cm on the ruler is 10 metres in real space or 10,000mm. Divide 15,000 by 10,000, giving you 1.5. What you need to do from here is put the plan on a photocopier and increase the size of the copy to 150%. The new copy of the plan will now be at a scale of 1:100. Double check this; you will find now that when you put your ruler against the measurement that reads 15,000, it will be 15cm on your ruler. You are now good to go.

Expert Insights From Levi Saunders
Online Retail Specialist & Flooring Content Creator
If you are printing a pdf from a computer it should tell you both the scale and size of paper you need to print on to achieve that size paper. There are also measurements on the plan which allow you to check this once you have printed.
Use a highlighter to trace the areas where you will put your new flooring. This will make it clear which areas you need to cover.
2. Next, take a red pen to rule off all areas you have highlighted into square or rectangular boxes. This means if you have a square lounge room that runs into a hallway, make a red line between the 2 areas. You will now have a ‘Box’ representing your lounge room and a longer, thinner ‘Box’ representing your hallway. Continue this process until all of the areas highlighted on the plan are boxed off in this way.
3. In each of those ‘boxes’, measure the length and the width. Let’s look at our lounge room. Let’s say that when we measure the length, we get 5.4cm. Then we measure the width, and it comes to 4.2cm. We then multiply these numbers on our calculator, and we get a result of 22.68. This is the total square meterage of this area. We take our other coloured pen or pencil and write ‘22.68’ in the ‘Boxed’ lounge room area.
You continue this process across the entire plan. Write down these numbers in each of the Boxed areas.
When you have completed this process, start a column on one side of the plan or a spare piece of paper. Write the measurements of all the areas down the page as you go.
As a double-checking method, count the boxed areas you have created on your plan. Then count the amount of numbers you have written in your column to the side. If you have 8 Boxes and 8 numbers to the side, you are good to go, because you have not missed any of them. If you have missed a number, find out which one it is and add it to your column. Alternatively, if you have counted a number twice, work out which one it is and delete it from your column.
When you are sure everything is correct, add this and write the total under your column. This is your net meterage. In the case of our example, we are going to work at a total of 112.65m².
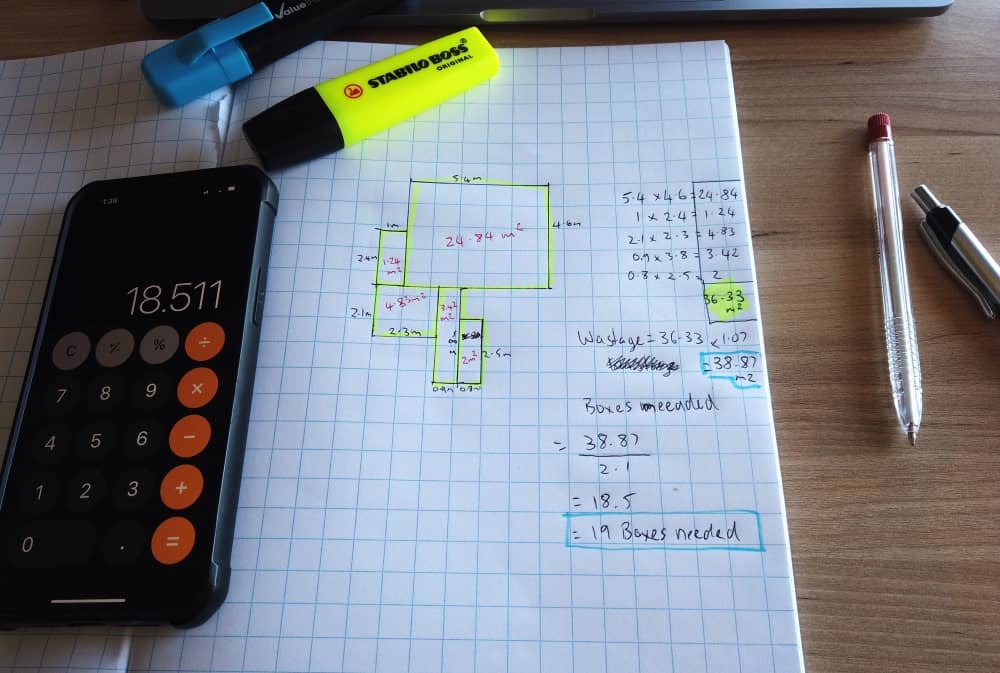
4. So we know our measurement is 112.65m². You now need to account for waste, and 7% is a good number to work with. 5% can sometimes leave you in the lurch; unless you make many mistakes, 10% will be too much left over in most cases.
There are 2 ways to do this. First, jump onto our website, find the product you want, put in the meterage you require, and then hit the 7% wastage button. This will also allow you to skip step 5, as it will already be done for you:
The next is the way the flooring industry used to have to do it before the arrival of the Online Flooring Store. So, working on 7% waste, multiply 112.65 x 1.07. This is 120.5355. We will round this to 120.5 because the more we multiply, the longer these fractions get, and they are unnecessary. Rounding this small fraction off will make no difference at all, as it will be covered in the next step.
5. Next, you will want to know how many boxes you need to order. If you have used our website, this will already be done.
If you prefer the challenge, then what you need to do is as follows:
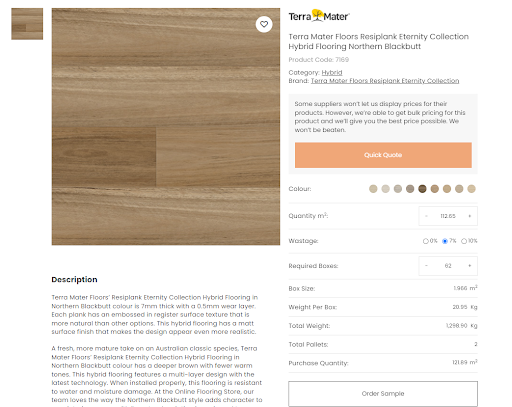
Find the product you want from our website, and find out how many square metres are in a box. With the example from the website, we used Terra Mater Resiplank Eternity. However, as the website did the hard work for us on this one, to use the same product would just be lazy. This time we will use Elysium Hybrid from the Online Flooring Store’s Eclipse Range.
This product has 2.1 square metres in a box. What we need to do is divide our gross meterage (120.5m²) by the box size of 2.1m². This gives us a total of 57.38 boxes required for the job. However, we cannot order partial boxes, so we must round this up to 58 boxes.
To determine the meterage we need to order, multiply the number of boxes required (58 in this case,) by the box size (2.1m²,) for a total of 121.8m².
House Plan Method Without a Photo Copier

If you have house plans but don’t have access to a photocopier and the house is not on a 1:100 scale, don’t despair; you can still pull this off.
To start with, you have to do the same thing as you would with any plan and find out what the scale is. Use the process as outlined in point 1 of the House Plan Method. Let’s say you get the same scale as above (1.5). Write this down and highlight it.
You will still highlight the areas in which you will put your new flooring and rule the plan into boxes the same way.
Then, measure all of the areas as you did above. Remember, though, that these are going to be out of scale. This is not a problem.
At the end, when you have tallied up all the meterages and checked that you have not missed anything, you will have your total in the same way that you did in Step 3 of the House plan method. This number is the total, but it is incorrect because the plan is out of scale. What do we do now?
Remember how we wrote ‘1.5’ at the top of the page and highlighted it? This is our magic number. This is how much we have to multiply our amount, but we have to do it twice as we work in square meters. Therefore, we multiply our meterage by 1.5, and then take this number and multiply again by 1.5.
Confused? Don’t be. Because we are working with square meterages, what happens on one axis happens on another.
For example, we multiply 2 by 1.5 to get 3. However, if we square the numbers (2×2 is 4, and 3×3 is 9) and try it again, 4 (which is 2 squared) multiplied by 1.5 is only 6. We then have to multiply again by 1.5 for the other axis, which takes 6 to 9.
Then all we need to do is add wastage and discover the amount of boxes you need using points 4 & 5 in the above method.
Although the photocopier method is preferred, both of these methods allow for a little bit of leeway and are accurate enough to ensure you order an optimal amount of flooring.
How to Work Out Square Meterage of a Room With No House Plan
Use some graph paper with boxes up to 1cm grids for the best result if you can. You can also use 1/2 cm grids, but remember the scale is 1cm = 1m to make things easy. I prefer the smaller grid, but this is only a personal preference.
Start measuring your rooms’ length and width and build a map of your house as you go. You will be a little under in some areas and a little over in others, but this will even out across the plan.
If the room is 4m x 5m, then you rule a box on the grid paper 4cm x 5cm. Repeat this process for all areas in your home that will require flooring.
You don’t have to create a work of art, as few other people will appreciate the effort you have put into it. Simple boxes will suffice. Note the measurements of each area as you create the ‘boxes’ (length and Width) just in case you make a mistake measuring. This way, later, when you start to work out your meterages, if the measurement you wrote down at the time does not match what the ruler is saying, you will know to go back and check.
Once you have drawn your house plan, you should follow points 3,, 4, and 5 above, rule the areas into boxes, calculate square meters, add wastage, and calculate the number of boxes you need.
Note: You do not have to draw the whole house plan but need to make sure the area where you are laying flooring is drawn out.

Expert Insights From Clem Sturgess
20+ years' experience in hard flooring
Years ago, when I was working in Flooring Retail, this is how we all did things. I remember the first home that I did when I started in the industry was a huge 2 story affair. I think my boss sent me here deliberately, as I had a background in mapping, and I wanted to show how accurate I could be. The thing took me over an hour and a half, and I had measured everything in minutia. I had impressed myself; now I just had to impress the boss.
After the job was laid, he sat with me one time and complimented me on the plan and the detail I had gone to. He then asked me how long it took. I told him it was nearly two hours, and he was again impressed as he thought it would have taken me at least 3 hours. I was feeling pretty good.
Then he pulled out a plan by someone with many years more experience than myself. It was just a bunch of boxes on a piece of paper. He said to me ‘This took Alex 10 minutes.’
My bubble was instantly deflated. He went on to say that there were only 2 measurements in a room that mattered: Length and Width. If we got that right, the rest, while looking very pretty, was a waste of my time.
The Lesson: Don’t make my mistake.
How to Calculate Floor Area With No Plan & No Drawing
This method is less accurate but will suffice in most cases.
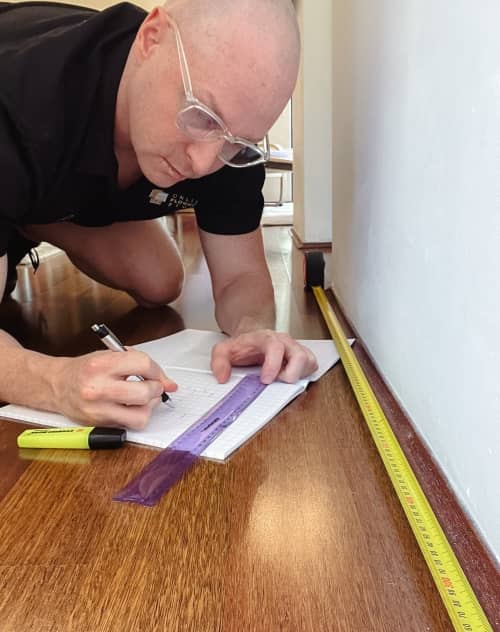
Measure each area and tally the number down as you go. You have to be diligent about covering your areas correctly, but it is a simple process. Just remember that the length x width of a room will give you the square meters you need.
This method does not have the built-in safeguards of the other methods, so only use this if you are very confident.
Additional Things to Remember
- Measuring curved areas and unusual angles
When measuring curved areas and unusual angles, remember the product needs to be cut to fit that area, so be sure to ‘box off’ these areas and make sure that they are allowed for in your calculations.
- Measuring for skirting & Scotia
If you will be using skirting or Scotia, measure the perimeter of the area you will be laying flooring on and tally it up to the nearest lineal meter. Regarding doorways, you also need to know which trims you will use, their lengths, and how you will cut them to fit into entrances and areas. If you are using an installer, it may be better for him to help you with the final decision regarding ordering trims, as he will have more of a say in how he would like to lay them.
FAQs
While drawing a plan isn't necessary, it's one of the most reliable methods to ensure accuracy. However, if you're confident in your measurements, you can measure each room's length and width and multiply them together.
Just remember that simpler is often better, and as mentioned, you only need two measurements per room: length and width.
The recommended wastage allowance is 7%. While 5% might be cutting it too close and 10% will likely leave you with too much excess, 7% is the sweet spot that accounts for cuts, mistakes, and awkward angles while keeping costs reasonable. You can easily calculate this by multiplying your total square meters by 1.07.
For curved areas and unusual angles, the best approach is to 'box off' these areas, measuring them as if they were rectangular. This ensures you'll have enough material to cover these tricky spots since the flooring must be cut to fit these areas. Having slightly more material than risk running short in these challenging spaces is better.