Last edited 21/4/24
Whether you have laid a new solid timber floor or want to rediscover and revive an old one, nothing screams elegance more than floor sanding, polishing and restoring timber floorboards. What is under your feet will ultimately determine the lengths an inexperienced DIYer can go before needing professional help.
Beau will describe the DIY process of sanding and polishing timber flooring and identify occasions when an old timber floor restoration may be better left to the professionals.
Timber Floor Restoration Commencement
When it comes to timber floor sanding and polishing, there are two main options:
- Working with a new solid timber floor
- Working with an old floor
As the old saying goes, why replace something if it’s already good?
In Tasmania, where my timber floor installation, sanding, and polishing business is located, old-growth forests have been harvested or protected. Nowadays, many of the new so-called hardwoods coming through are softer, more of a combination of hardwood and pine. This puts them into the new growth category.
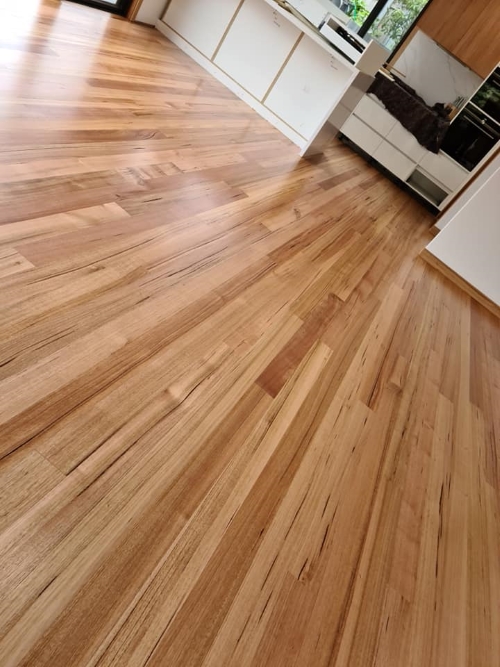
That’s not to say that the new hardwood floors you can buy now aren’t fantastic options, as they are. Still, old types of flooring, such as Tasmanian Oaks, are a quality hidden gem. Any homeowner should capitalise on this or, at the very least, make every effort to recycle. Their quality is often unsurpassed, and once restored, they look stunning. You would also be surprised by what can be repaired and reused. It is always more than you would think, and removing years of wear and tear will transform an existing floor.
Working on New vs. Old Floor Boards
As expected, sanding and polishing a new timber floor is distinctively different. That is true, particularly at the beginning of sanding and varnishing a new floor.
- Some homes around Launceston, Tasmania, where I work and live, are over 80-100 years old. As expected, they are much harder to work with and, in some cases, have been subject to excessive wear and tear.
- Undulations, cupping, old paint, and stains can all throw a spanner in the works. These things will influence the sandpaper grit used on the sanding machine to remove all stains and imperfections.
- In comparison, a new floor with softer wood will require far less abrasive grit sandpaper to start and far less work overall because there is no restoration involved.
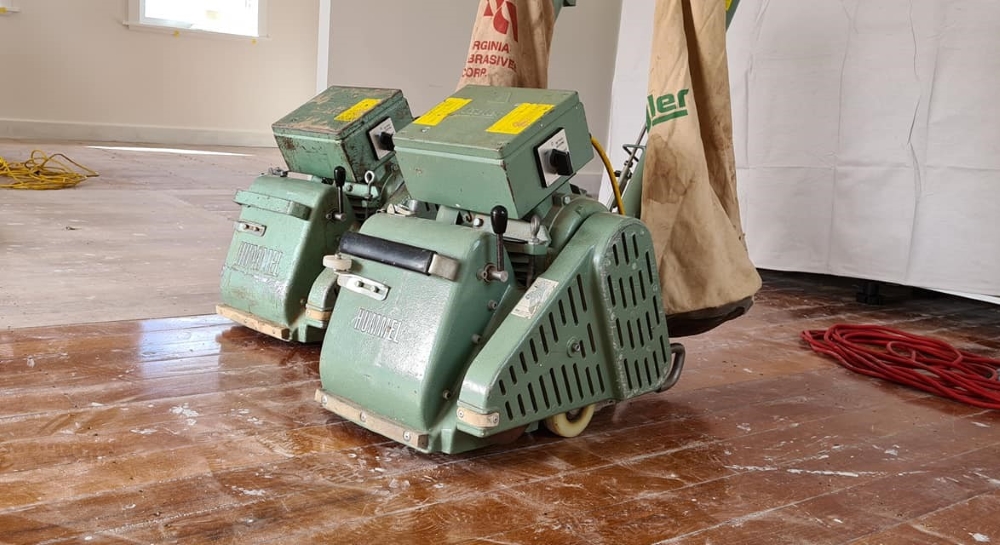
Timber Floor Sanding & Polishing Equipment Needed
Of course, you will have the latest top-notch equipment for commercial floor sanding. For a DIY project, there are three basic components you must have for timber floor sanding (most of which you can hire):
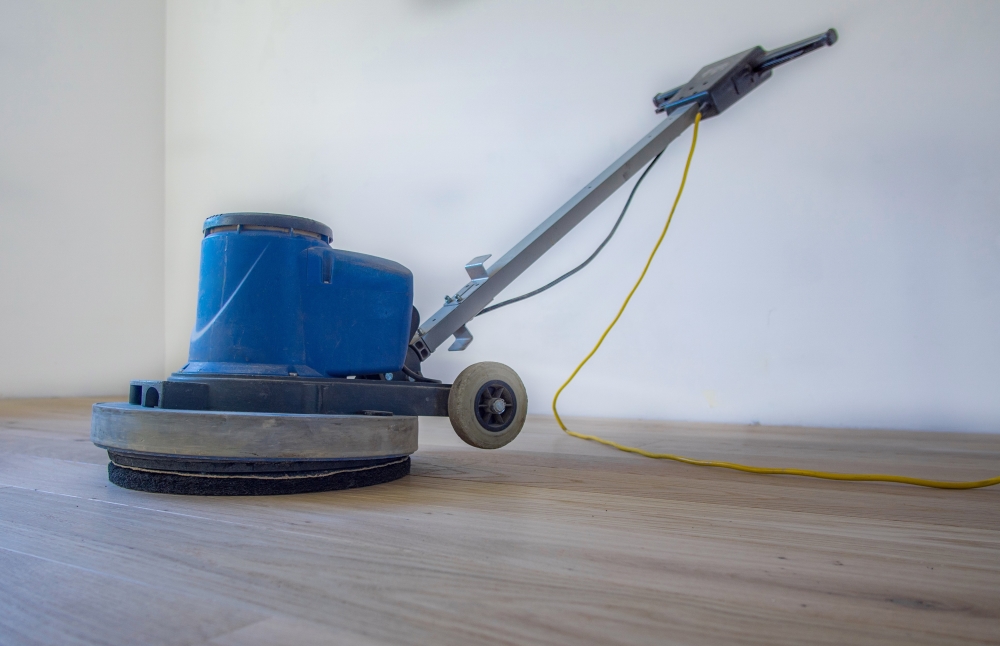
- Drum/Belt timber floor sander, which will cover the majority of sanding floorboards
- Flooring edger or sander to sand around the edges close to walls a drum sander cannot reach
- Circular buffing machine to buff, polish and finish the job. This is the most important part, as the smoother grits of sandpaper it uses blend everything in from where the drum sander and the edge sander have been. This is also crucial for small cutbacks between the varnish coats that need light sand with an abrasive where a drum sander is not suitable.
- Sandpaper – Depending on the type of job, the drum sander has a range of different grits up to 80/100. For an old floor, it might start as course as 20 grit. The circular sander will need 80 – 100 grit sandpaper disks.
- Mesh screen – Like a sanding disk for the circular sander, which is between 120 – 150 grit, which makes the floor very smooth.
- Hammer and hole punch – for punching nails in if the floor is a top nail profile.
- Industrial vacuum cleaner – preferably one with a good bag attached to collect the wood dust from sanding.
- Microfiber mob – Simple to wipe over the floor after vacuuming
Punching Nails
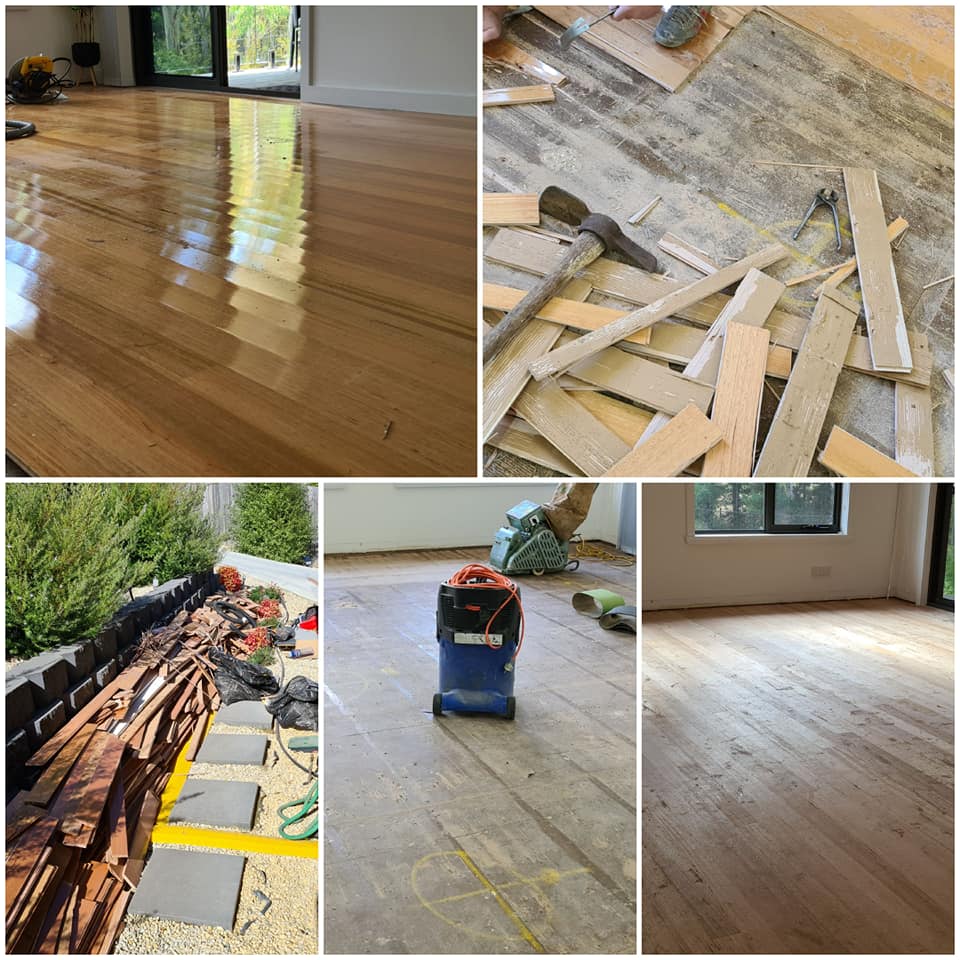
The first thing you will need to do, particularly on an old floor restoration job, is ensure that the runs of nails are far enough down not to cause issues. I cannot stress how crucial this step is—particularly considering gallant efforts to reduce costs to take on this DIY job. The last thing you want to do is pay for damage to a hired machine and have to replace the abrasives more regularly due to raised nails. An old floor with a decent amount of damage will require sanding a few millimetres off. This means the nails must be further down to allow for the extra sanding.
Simply take a hammer and a hole punch and hit the nails down. Being mindful not to damage the floor with the end of the punch or the hammer by missing. It is time-consuming, and I recommend doing it row by row and room by room until completion.
Expert Insights From Beau Della Valle
30+ years experience in flooring installation and surfacing
If the carpet was on the flooring, check for tacks or little nails, particularly around the edges, that you may have to remove with a hammer and pliers. These can be troublesome.
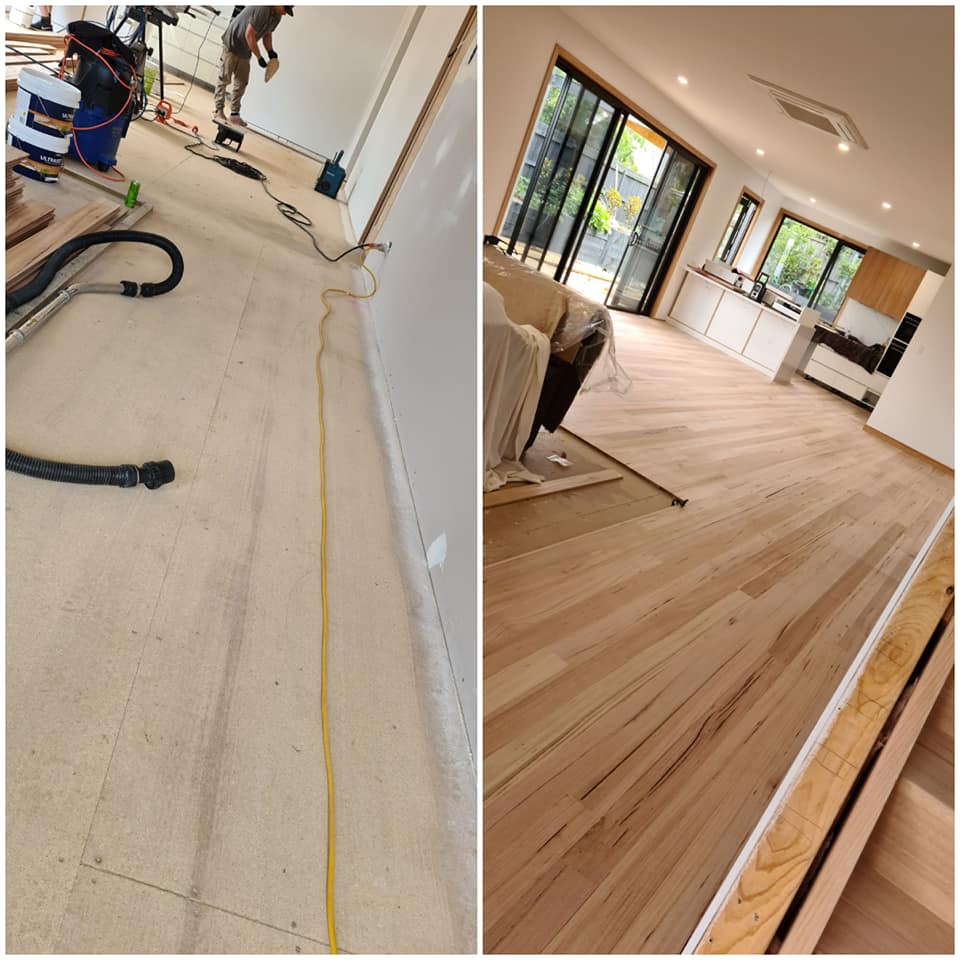
Many new timber floors are secret nailed where the floor is laid over the top of yellow tongue using a specialised machine. This means there will be no visible nails on the surface. In this case, all that will be required is a clean and a vacuum, and you are ready to start sanding.
Sanding Process
If the flooring has been laid over a concrete slab with little prep work done, quite a bit of sanding is required to get the floor looking even. As a rule, if you look at the boards straight on, veer off, and initially sand on a 45-degree angle to achieve that initial flat surface before sanding with the grain with lighter grit applications later on.
New Floor Sanding
- New floors typically start with 40-60 grit on a 45-degree angle.
- You will have butt-joins, which may need a bit of putty between the joins.
- Allow for 30 minutes for the putty to dry.
- Go around the edges with an edge sander using a 60-80 grit.
- Move onto finer grit sandpaper of 80-100 grit and sand in the direction of the grain of the wood.
- Go around the edges with a hand-held piece of 80-100 grit sandpaper and cover any areas the flooring edger missed.
- A mini orbital sander may also be handy for places a flooring edger cannot access.
- Using 100-120 grit paper on a circular buffing machine, go over and smooth everywhere the previous sander has been.
- Give the area a thorough vacuum in preparation for finishing the floor.
- Use an antistatic microfiber cloth and run it over the floor to stir and remove any access dust the vacuum cleaner may miss.
Old Floor Sanding
- Old floors, such as Jarrah and Tas Oak, with glue stains, unevenness, and cupping, may need to start with 40 grit or even lower to 24 grit.
- Then, move to a medium 60-grit before beginning around the edges with a flooring edger.
- The grit for the edger will depend on the hardness and damage of the floor, which needs working but should be in sync with the rest of the job.
- Vacuum the entire area.
- Now you must putty all the nail holes up. I recommend timber mate water-based hardwood putty, which has all your desired colours.
- Allow at least 30 minutes for the putty to dry.
- Now move to a finer 80-100 grit sandpaper, which also removes any putty residue around the holes.
- Using an old painter scraper, scrape around the ends of any edges that the flooring edger misses. Also, have a piece of 80-100 grit sandpaper on hand to sand over any bits you scrape.
- Mini triangular orbital sanders on hand are also helpful for reaching parts. Using an edge sander can be quite challenging, and an orbital sander can be fantastic for smoothing things over.
- Using a circular buffing machine, starting with 100 to 120 grit paper, sanding over and blending in everywhere the sander has been.
- Give the whole area a thorough vacuum in preparation for finishing the floor.
- Use an antistatic microfiber cloth to go over any areas to pick up fine dust the vacuum cleaner may have missed.
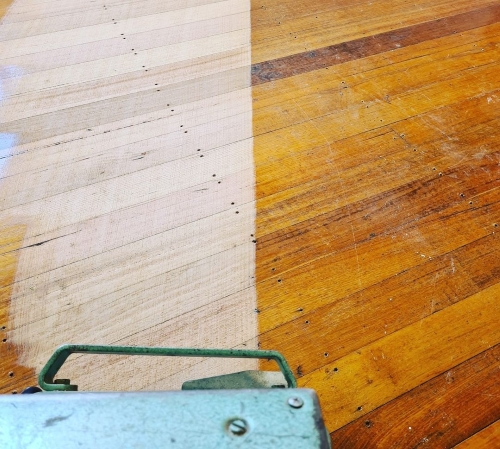
Finding the right grit to get your floor flat initially is crucial, so if a finer grit isn’t doing the job, you may need to start on something more coarse. The bottom line is marks will always come out if you are working on a flat floor.
Expert Insights From Beau Della Valle
30+ years experience in flooring installation and surfacing
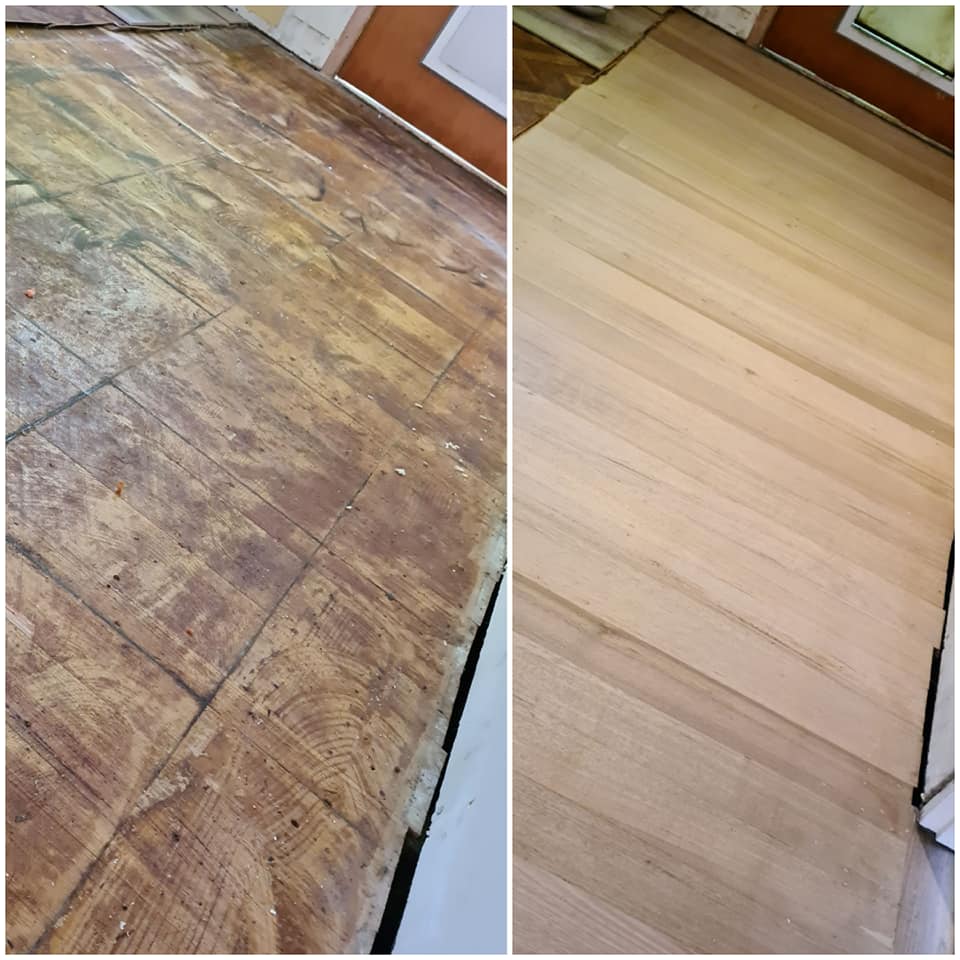
If you are resurfacing a floor that you have had to pull up old carpet to get to, chances are it has never been sealed off with any varnish. This will require rough grit because it could be 50+ years old stains and unprotected, which will need the surface layer removed to freshen it up. Sometimes, you will need a 24-36 grit initially sanding adjacent to the grain.
Areas such as old veranda extensions that used the old style of lead paint are outside the reach of a typical DIY-er and better left to the experienced.
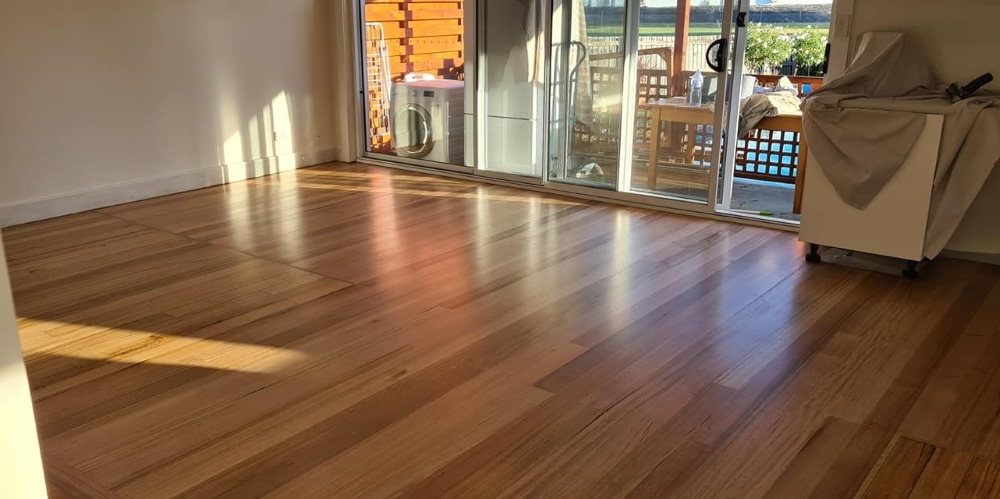
Restoration and Polishing of the Floorboards
Ask yourself, “What type of Finish do I want on the floor?”
My preference for a DIY-er is to steer clear of hand staining the floor yourself, as getting it requires a lot of skill.
For most people, accentuating the natural colour of their floorboards meets their requirements.
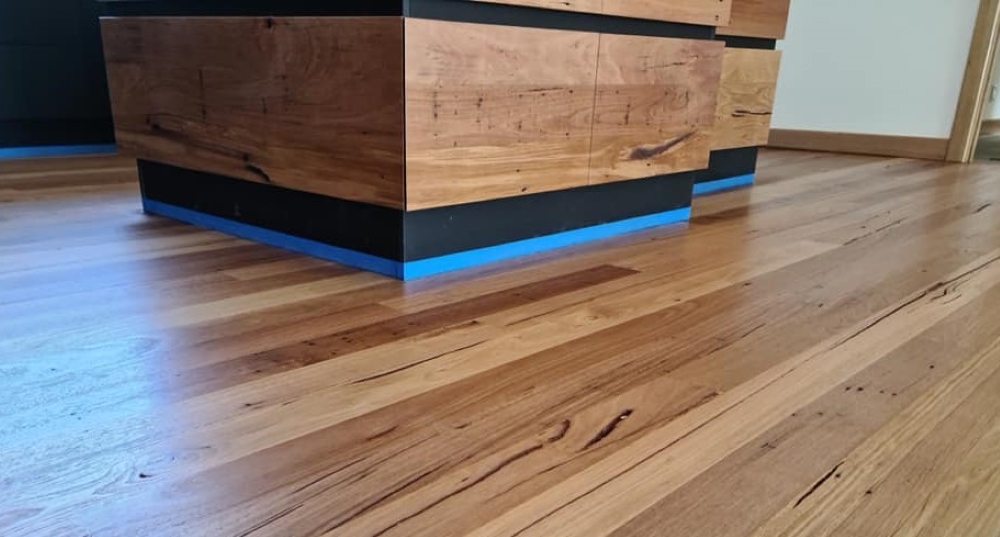
Over a decade ago, opting for Polyurethane-based shiny two-pack finishes that would look more glossy than a toffee apple was quite trendy.
The popularity has swung towards a more natural matt or satin-based finish. I am a massive fan of hard wax oil by Fiddes because it is easy to apply for a DIYer, very receptive and easy to repair and conceals any future scratches with extra product in the future. In most cases, you can just rub a small amount of wax oil over a minor scratched area, enough for it to bend back in.
Polyurethane-based finishes will be far more cumbersome to try and conceal scratches, which will also tend to stand out more.
Polyurethane-based Products

This solvent-based product is generally not as UV stable, meaning that over the years, it can go an orangy colour as it oxidises and gets exposed to the elements. That being said, water-based finishes come up the clearest. Don’t be fooled by the milky whiteness in the tray; it dries very clear.
The toxicity of polyurethane, although not as toxic as decades ago, is an issue and is even banned in some countries around the world. It is still recommended to keep families away from the drying product for some time. This product aims to create protective layers that sit predominantly on top of the timber. This blog further covers eco-friendly flooring considerations and options.
Water Based Products
Alternately, water-based finishes have come a long way for those who still want this style of finish and can provide a good, if not better, result without the same toxicity concerns.
Hard Wax Oil Finishes
This product doesn’t go orange but can become slightly warmer brown over time, which isn’t usually an issue.
Pro tip: I like to add 5-10% white flooring tint to the mixture, which helps preserve the natural clear colour over time.
As you may have guessed, hard wax oils are much less toxic and environmentally friendly.
The goal of this product is to penetrate the timber through two application coats only.
The Application Process
Firstly, for new flooring, we recommend reading this blog post to get a basic understanding of the acclimatisation of flooring and how flooring can expand and contract through the seasons.
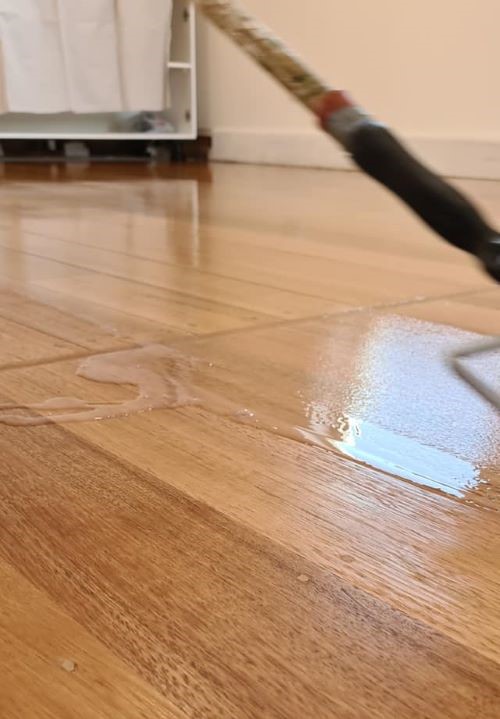
We recommend following the application process provided on the back of the container for your specific product. However, traditional methods of applying the products are much like painting but on the floor.
- The first step is to cut the edges in places the roller can’t reach with a brush.
- Water-based finishes are thick and require a 10mm Nap microfiber roller cover. They need heavy applications to begin with, especially initially.
- The polyurethane-based finish will also need thick applications. One of its advantages is that it has self-levelling properties. It also has a meter rate regarding how much product per area you should aim to cover.
- Hard wax oils are thicker again and require a 4-5mm Nap microfiber roller; however, the solution stretches a lot further. Although it is a more expensive per litre product, it is cheaper because you would cover up to double the square meterage per litre compared to polyurethane-based products.
The application of water-based products can be challenging. I recommend applying thick and not rolling over the wet product too much. For the first-timers out there, don’t look too much at the coating as it is drying because it appears a lot messier than when it dried.
I recommend applying finishes in small strips to avoid lines. Going along the width of 3 or 4 boards works well; remembering to cut in with a brush first and continuing from wall to wall. Make sure to roll through any unevenness or streaks as you go.
Using a Mesh Screen
Note: hard wax oil may be smooth enough after the first application not to use a mesh screen and is ready for its second application. You will need to be the judge of this.
After the first application of your finish has dried off, you are ready for the buffing process using a 150-180 grit mesh screen on your circular floor sander/buffer. Lightly run this over the top of the floor, which rough and smooth it up enough for the next application to take hold and stick appropriately onto the floor. You can use the screen to rub around the edges of the floor where the buffing machine can’t reach.
Once you have finished, vacuum thoroughly and go over the floor with a static mop.
The Second Coat
After the first coat, the second coat is generally more straightforward, with a lot more playtime as the floor has already soaked up the first coat. The hard wax oils will only need a thinner coat, while polyurethane and water-based products still need a thick coat plus an additional third coat for the best results; remember to use the mesh screen in between.
When is Your Floor Dry?
Most floors will take around ten days to cure fully. The first two days are the danger zone, and I strongly advise not dragging anything across the floor during this time as the floor is more susceptible to scuff and scratch marks. After a few days, you can move furniture back in, but err on the side of caution. Using felt stoppers on the bottom of your furniture will also help save your floor in the short and long term. Do not drag any furniture across the floor; you should only be lifting and placing.
Maintenance of Your Floor
Be sure to vacuum or sweep the floor first before mopping.
With polyurethane-finished floors, avoid using too much water to clean the floor, as water and timber do not mix well. Timber is a natural product that expands, contracts, and soaks up excess water. Enyo mops work well, or any mop that allows you to squeeze most of the water out before you apply it to the floor.
You can get specific timber floor solutions for mopping, which are excellent. I also recommend adding a cap full of methylated spirits to this to help the floor dry quicker.
Do not use methylated spirits with water-based flooring and hard wax oil finishes. Use specific products designed for that flooring finish to clean effectively without damaging the finish.
Maintenance Coating
I always recommend to clients after 2-3 years to get a light buff and coat done instead of waiting 5+ years. This saves money and keeps the floor looking nicer and protected long term. Waiting too long to treat your floor again could mean a full strip back and refinish from scratch. So, choosing light buff and coats after a few years is a great way to preserve your floor long-term.
The same can be said with engineered timber floors, where you only have so much veneer to play with. Some fantastic specific water-based finishes for engineered floors allow you to do a light buff and stick directly onto the floor, preventing cutting into the veneer and replenishing the wear layer.
For more information on finishing hardwood floors, we recommend checking these experts in hardwood floors in Vancouver, BC.
Frequently Asked Questions About Floor Sanding and Polishing
Here in Tasmania, I work with many old-growth timber floors that are 80-100 years old, and let me tell you, they're usually worth saving! Those old Tasmanian Oaks are absolute gems that you can't get anymore.
Even if you're looking at deep stains, wear and tear, or cupping, you'd be amazed at what can be restored. Sure, you might need to start with a more aggressive 24-grit sandpaper, but don't write off that old floor until you've had a proper look. Nine times out of ten, there's beautiful timber hiding under there.
Here's my rule of thumb after 30 years in the business: do the water test. Drop a few water beads on different areas of your floor, particularly in high-traffic spots. If the water sits there beading up, you might just need a light cutback.
But if that water starts soaking in and darkening the timber within a few minutes, you're looking at a full sand job. One important note - don't just test one spot. Your hallway might need a full sand while your spare room just needs a light buff!
Look, I'm a huge fan of hard wax oils for DIYers, and here's why: they're more forgiving to apply, much less toxic (you won't have to evacuate the family), and they're brilliant for touch-ups. Got a scratch? Just rub a bit more oil over it.
With poly, that scratch is there until your next full sand.
Here's a pro tip I don't share often: add 5-10% white flooring tint to your hard wax oil - it helps preserve that natural timber colour instead of warming up too much over time.
This is where experience counts. Those patches could need anything from standard 40-grit to heavy-duty 24-grit sandpaper to level out. But here's the golden rule: if you've got the floor flat, those marks WILL come out.
The trick is getting it flat first. Don't rush straight to the fine grits, hoping for a miracle. One warning: if you're dealing with old veranda extensions with lead paint, step away! That's one for the professionals.
Here's the unvarnished truth (pun intended!): while most floors take about ten days to cure fully, the first 48 hours are your danger zone. I don't care how careful you think you'll be, don't drag anything across that floor for at least two days! After that, you can start moving furniture back, but only if you lift (never drag) and use felt stoppers.
Don't wait 5+ years for your next refinish. Get a light buff and coat done after 2-3 years; it's cheaper and keeps your floor looking better for longer.